Installation Tips
Basics:
A 12” - 16” span (or less) between support beams under the planks is recommended; a span over 16” is not recommended.
This span is not for strength or structural concerns. It is for animal comfort as our planks have flexibility. You could stretch our planks to the ground, and they wouldn’t break, but if you get much farther out than 16”, heavier animals could start to bounce and mill about.
If you want to leave a gap between planks, the distance can range from 1/4” to 1”.
A 1/2” gap is the most common, but it is entirely up to you and your state regulations.
Also, if your planks run side to side, you can leave a ½” to ¾” gap next to the sidewall on each side of the trailer to facilitate the cleanout of manure and mud under the planks with a pressure washer. This allows for airflow and reduces corrosion points.
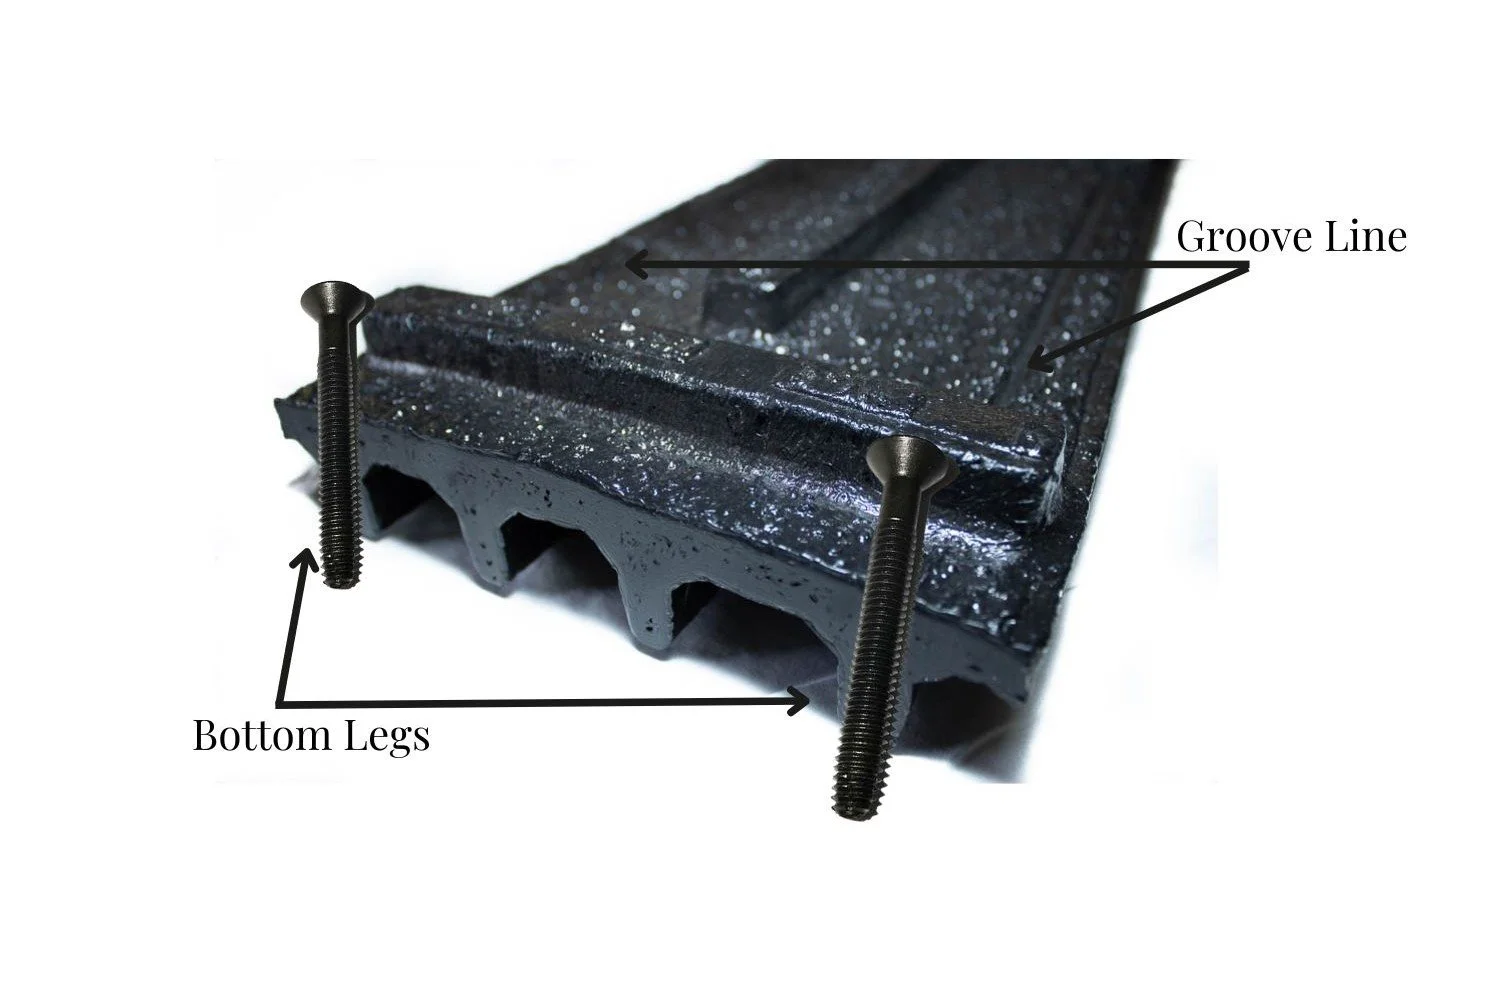
Screw placement:
You must catch the full height of the plank with the screw. To do so, we created groove lines on the top of the planks as a placement guide.
The groove lines look decorative, but they are functional and very important.
The legs underneath run the full length of the plank, so if you drill through the groove line anywhere on the plank, you should catch a bottom leg.
Please see the photo at the bottom of this page for reference.
IMPORTANT: The screws securing the plank down MUST pass through as much of the leg on the underside of the plank as possible. Failing to secure the screw through a bottom leg may cause the screw head to pull through the plank.
Screws & Drilling:
Always drill a pilot hole (#7 drill bit) and use 1/4” x 2”-2 ½” (diameter x length) self-tapping screws.
Any self-tapping screw works - steel, galvanized, stainless steel, or even carriage bolts with a self-locking nut.
You will need a minimum of seven screws per plank. Two screws are needed at each end of the plank by both sidewalls, and at least three additional screws through the support beams are recommended to help control movement. You can use more screws than this if you prefer; seven is the minimum we recommend.
Most customers find using a corded drill is faster than using a cordless drill, unless you have multiple batteries on hand. It takes around 15-20 min to install each plank once they are cut.
Cutting to length:
You can use any standard woodworking tool to cut our planks. Skill saw, chop saw, table saw… it doesn’t matter. They cut as easily as wood.
Use a metallic (silver or gold) Sharpie to mark cut lines and cut planks one at a time, as your trailer might not be square.
For either pattern (directions below), make sure to line the logo going in the same direction and cut from the same plank end every time.
Filling spaces:
There may be odd 4” or 6” spaces between a full plank and the next steel cross member. To ensure complete coverage between plates, you can rip boards lengthwise.
IMPORTANT: If you rip a plank to fit an odd space, make sure you have at least two remaining underside/bottom legs.
You may consider ordering an additional plank to ensure you can complete the installation. It’s around $90 to FedEx one plank to your house (ask us how we know :)
If your planks run from front to back:
You will need to weld in two pieces of angle iron, near the meeting point, so you have a platform to drill them down, creating a ‘seam’ at that meeting point.
Patterns:
Our 78.5” planks can easily be made into two different patterns - aligned and offset - as the pattern is built into the plank.
Aligned — Line up the planks all going in the same direction with our logo on the right (words facing you), and you have the aligned pattern.
Offset — Take every other plank and flip it 180 degrees. The logo is now in a zigzag pattern, with the logo on both the right and the left (words facing you and facing away), giving you the offset pattern.
Our 96” planks, when used at full length, can only be installed in the aligned pattern. But if you are cutting them shorter (eg, 7’), then you can stagger them when you cut to get the offset pattern.
Leftovers:
If you have any small bits of plank left over at the end of the project, they make great stepping stones for muddy spots in the yard. Or you can flip them over and put potted plants on them.